Copyright (C) 2009
All rights reserved.
No material may be reproduced in part or in whole without written consent from holders.
DenMir™
Suggested Installation Steps:
How to Install
www.denmir.com
DRAWINGS
Customer Satisfaction is Our Goal
Door and Window Awning
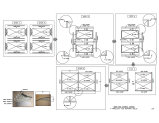
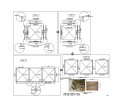
Multi Panels Awning (See drawings for details)
1. Partially peel off protective films along edges of panels for sleeves, aluminum supports and bracket installation.
2. Insert rubber sleeves on all sides of solid 3mm thick panels.
3. Insert front and back aluminum supports on shorter side of each panel.
4. Using a rubber mallet, carefully align and insert panels with sleeves and supports on brackets.
5. Install end and middle set screws to secure panel assembly and brackets.
6. Repeat steps for next panel/s - 2 or more panel design.
7. Mark and drill bracket holes on wall for fasteners/bolts installation.
8. Install and secure assembled awning with fasteners/bolts on wall.
9. Optional - apply caulk/sealant along back aluminum support/wall.
10. Remove protective films on pc panels.
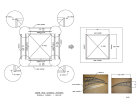
Single Panel Awning (See drawings for details)
1. Partially peel off protective films along edges of panels for sleeves, aluminum supports and bracket installation.
2. Insert rubber sleeves on all sides of solid 3mm thick panels.
3. Insert front and back aluminum supports on shorter side of each panel.
4. Using a rubber mallet, carefully align and insert panels with sleeves and supports on brackets.
5. Install end set screws to secure panel assembly and brackets.
6. Mark and drill bracket holes on wall for fasteners/bolts installation.
7. Install and secure assembled awning with fasteners/bolts on wall.
8. Optional - apply caulk/sealant along back aluminum support/wall.
9. Remove protective films on pc panels.
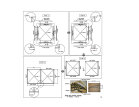
Multi Panels with Mid Support Awning (See drawing for details)
1. Partially peel off protective films along edges of panels for sleeves, aluminum supports and bracket installation.
2. Insert rubber sleeves on all sides of solid 3mm thick panels.
3. Insert front and back aluminum supports on shorter side of each panel.
4. Using a rubber mallet, carefully align and insert panels with sleeves and supports on brackets.
5. Install end and middle set screws to secure panel assembly and brackets.
6. Repeat steps for next panel/s - 2 or more panel design.
7. Mark and drill bracket holes on wall for fasteners/bolts installation.
8. Install and secure assembled awning with fasteners/bolts on wall.
9. Optional - apply caulk/sealant along back aluminum support/wall.
10. Remove protective films on pc panels.
Single Panel Awning (See drawings for details)
1. Partially peel off protective films along edges of panels for sleeves, aluminum supports and bracket installation.
2. Insert rubber sleeves on all sides of solid 3mm thick panels.
3. Insert front and back aluminum supports on shorter side of each panel.
4. Using a rubber mallet, carefully align and insert panels with sleeves and supports on brackets.
5. Install end set screws to secure panel assembly and brackets.
6. Mark and drill bracket holes on wall for fasteners/bolts installation.
7. Install and secure assembled awning with fasteners/bolts on wall.
8. Optional - apply caulk/sealant along back aluminum support/wall.
9. Remove protective films on pc panels.
Multi Panels with Mid Support Awning (See drawing for details)
